

How To Repair A Faulty Lamp Switch On Lamp Cord
A table lamp contains a simple electrical circuit comprising of the conductive road and insulated surrounding parts.
The electricity travels via the brass in the plug, along the copper inside the dark-brown 'live' wire to the alloys in the electric bulb, and then returns via the blue 'neutral' wire. A switch interrupts the circuit. The 3rd prong for the yellow and greenish 'Earth' wire – not always present on a lamp – is a safety road that encourages rogue electricity to travel through it rather that y'all if the blue and the chocolate-brown wires have continued, making a brusque circuit. Needless to say, agreement how electricity travels is essential in the process of detecting and fixing the fault in any electrical appliance.
You volition need:
A multimeter
Sheath strippers
Wire strippers
Long nose pliers
A minor flat and small crosshead screwdriver
Wire cutters
Electrical record
1) Before yous begin, check information technology's not just the bulb that has blown by replacing it with a new 1, or switching it with a seedling from a working lamp. Test the wall socket too by plugging in a working appliance.
2) Once you're sure it's the lamp at fault, make certain you work in a well-lit surface area and on a flat surface. Unplug the lamp – never work on an appliance that is plugged in.
3) The problem could be a blown fuse. Open the plug. British plugs are prophylactic, only quite fiddly. Unscrew the top part of the plug (the function with the three prongs) while laying the back of the plug in your other paw. Don't fully remove any of the screws. Remove the fuse and check it using the multimeter (these price effectually £10). The simplest testers to use have ii leads with metal probes or clips at the end, and a master trunk with an indicator needle. Choose the OHM setting on the meter, connect the scarlet probe to either end of the fuse and the black probe to the other. If the fuse is not broken, the meter will register by moving the indicator needle from left to right. Always supercede the fuse with one of the same rating.
4) If the fuse is fine, next check the wiring. "Bad" wiring is not only incorrect wiring, but as well wiring that isn't tight and secure.
a) Wiring the plug

Check to see that all the wiring is tight and secure. New plugs have instructions on an attached paper – read them first. The wiring is ever to the same principle, merely all plugs accept a cable securing device that differs slightly in some designs. Make certain the white sheathing cable is deeply held in the plug, equally this will keep the wiring firm if the cable is tugged or tripped over. The chocolate-brown (alive) wire connects to the prong marked "L" with the fuse fitted. The blue wire fits into the prong marked "N" on the plug. If you are rewiring the plug, use wire cutters to ensure that wires are the right length, as indicated in the instructions, and employ wire strippers to expose about 5mm of copper wire. Brand sure that all the exposed copper is securely attached under the brass screw on each of the prongs in the plug. Never use kitchen knives or your teeth on blank wires!
b) Wiring the bulb holder
Check the wiring in the bulb holder. Unscrew the plumbing equipment and audit the connections. If in incertitude, supplant the unabridged bulb holder with a new one. A metal bulb holder requires a iii core, earthed cable. Lamps with plastic fittings need a two core, six amp cablevision.
c) Replacing the string
If you see any breaks or exposed wiring, it is advisable to supercede the entire cord. Threading a new cablevision through the inside core of some lamps can be quite tricky, but you can connect a new cord to the terminate of the old one past joining the exposed wires together later on removing the plug – or exposing the wires at a point above any broken part of the cable – and taping them together with electrical record to create a polish connection.
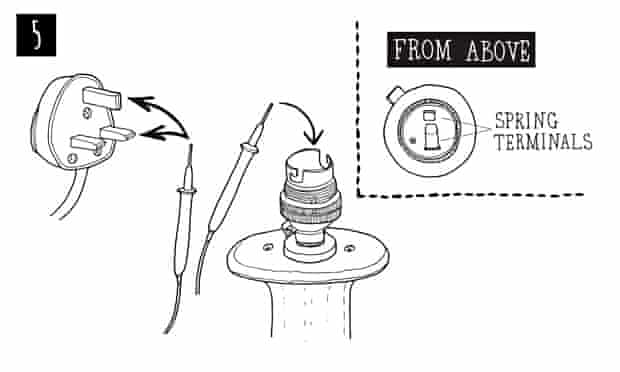
5) Lastly, always test for continuity with your multimeter before plugging your lamp dorsum into the socket. Place one tester probe on the brown or blue connector prongs on the plug, and the other probe on 1 of the spring terminals inside the bulb holder. Make sure the probes are not touching any other function of the plug or bulb holder. If the test indicator needle does not swing to the right, move one of the probes to the other prong. Carry out the same procedure for the other prong. If the needle does not swing, bank check that the switch is switched on. Finally, place both probes on both prongs of the plug. This time, the needle should not swing. This indicates that in that location is not a short circuit. Place a working bulb in the bulb holder and plug the lamp into the wall socket.
Alison Winfield-Chislett is the founder of the Goodlife Centre, an independent practical learning space in Waterloo, London that provides a fashion for busy, role-bound people to attend evening and weekend beginner workshops in basic DIY, woodwork, upholstery and traditional crafts.
How to mend ... a croaky iPhone screen
How to mend ... a scratch on wooden furniture
Interested in finding out more about how yous can live meliorate? Have a look at this month'due south Live Better claiming here.
The Alive Amend Challenge is funded by Unilever; its focus is sustainable living. All content is editorially independent except for pieces labelled advertising feature. Find out more than here.

Source: https://www.theguardian.com/lifeandstyle/2014/aug/25/how-to-mend-a-faulty-table-lamp
Posted by: joneshaviculd62.blogspot.com
0 Response to "How To Repair A Faulty Lamp Switch On Lamp Cord"
Post a Comment